Wednesday, October 3, 2012

Shade Arbor

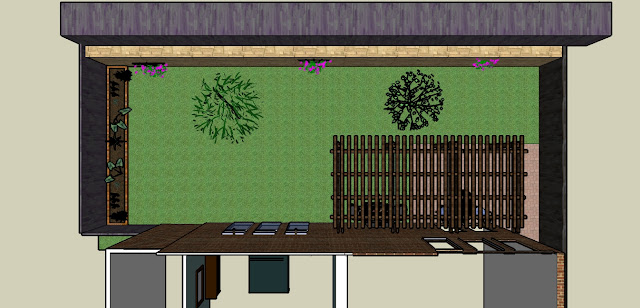
Since we moved into our house almost 3 years ago, I've always envisioned a shade arbor in our little back yard.  This summer my hubby was awesome enough to help make that dream a reality.  I drew up all the documents for the permit from the city and HOA, and showed him how I thought it should be put together after much research on my part.  Here are several of the drawings I did...
 Side Elevation
Back Elevation


 I knew most of the restrictions for our neighborhood after looking on the city website, It had to be 10' from the back fence and 3' from the side fences.  The only thing I didn't realize until we were getting the permit was it couldn't be connected to the house.  If it was connected to the house it had to be 20' from the back fence which is my entire back yard.  So, even though the drawings don't show it, I added four more posts next to the house so it is close but not attached.  

The lumber we used

(8)  6X6X12   Treated Lumber
(8)   2x8x10   Treated Lumber
(12)   4x4x8   Treated Lumber
(28)    2x4x10   Treated Lumber


First my husband dug the eight holes in the back yard for the posts.  We used Simpson Strong Tie 6x6 posts and he installed them after an inspector from the city came to look at the holes.  
Close up.

 We bought the wood we needed as we made progress so we didn't have to work around the extra since our backyard is so small.  David, my hubby, stained all the wood before he put it up.  We used treated lumber from Lowes.  When picking out the wood we always tried to pick the straightest boards since they can tend to warp if you are not careful.  
Here are the posts once he got them up. 
We used 8 inch bolts two in each post.  This costed more than I thought it would they were like 2$ a piece not to mention the cost of the nuts.  But, I estimate, we still spent less than 1000 on the entire thing.  So it was a win in my book.  

Next came the cross beams.  One bolt held up two beams, one on either side of the post.  We either used 10" or 12" bolt I can't remember.  
We used self drilling wood screws to attach the next bunch.  

Finally, we attached the shady part!  I think it turned out great!  

That's all we've done for now, but we have had the final inspection and it was approved!  The next thing we have to do is add the rest of the patio stones under it, we've already started killing the grass there so it won't be as difficult!

I may cover up the brackets low to the ground by adding some molding around the bottom of each one so you don't see it.  But, it doesn't seem to bother me as much as I thought it would so I'm not sure if I am going to.


Friday, July 27, 2012

Disc Golf

David has been very into Disc Golf the past two years or so, and practices and plays all the time.  Kiba, one of our huskies, has been getting very bored lately and has been needing a job.  So, our solution, let Kiba be his disc golf caddy!  I looked up pictures of other people using their dogs for this and worked my way through making our very own dog disc golf bag!  What do you think?


Friday, April 27, 2012

DIY Pallet Garden

OK, I saw this on pinterest and decided I had to make one!  I decided I wanted mine to be stained tho so that added a few extra steps.  

First Find a pallet you like,  I had a few to choose from but only decided one was worth saving.

 Second, I sanded the black spots off with a sander thinking it might show through the stain.  My stain turned out a lot blacker than I intended it to be so I probably could have skipped this step.

 Next, I stained it. Be sure to have something under it so you don't stain the floor.

Then, using Landscape Fabric, I cut strips and stapled them inside trying my best to hide the staples.  Remember dirt and plants go in so its not a huge deal if its not perfect.

Close up of finished pockets.

 Move to desired location and add dirt.

 Arrange how you want the plants to go.

 Plant them!

 Water, and you're done!

Easter and Scarborough Fair!


So, its been a while since my first post, but I haven't forgotten about you!  Lets see... I've got my new car.  Lilly is now crawling around everywhere standing and even taking a step or two at times!  

Here are her Easter pictures!


On a different note, I've started a mothers group... Mom's the word!  David thought of the title for me and everyone seems to like it.  I've been having play dates with these two mom's... Jenny and Michelle for a while now.  Since makeing the group we've had one more mom show up, Valerie.  Hopefully more mom's will join in the fun!  Yesterday we had a play date at a local park and here are a few pictures from that!


This year we've been to Scarborough Fair twice already!!!  I ordered her cute little Fairy costume from a lady on Facebook... https://www.facebook.com/formyprincesstutus  I thought it turned out adorable!  I love it and once I had it it looks really easy to make.  I am planning on making more for her later, I might post a blog on how to create one!


Riding on her daddy's shoulders!


Bluebonnet Baby

Bluebonnets!  I've tried to get a happy baby in bluebonnets 3 different times! This last time I finally got a smile on her face but only from the side... Here are my favorite pictures I've taken so far....


I have a friend, Michelle, who is from Main.  I was talking about bluebonnet pictures and how I wanted to take some of Lilly, and a few minuites into the conversation she asked what's a bluebonnet picture!  It never occured to me that someone from another state wouldnt know what that was.  I responded, "it is something every Texas mom takes".  

Saturday, March 3, 2012

Starting Out...

So, I've decided to try to start a blog.  Not about one thing in particular but on all aspects of my life.  All the things I love listed in no particular order... being a mom, doing crafts, sewing, my dogs, photography, dieting, Tae Kwon Do, and my husband.  I love my life and I thought I would share it with you.

One of the new things going on in my life is that I've just recently started an Etsy store. www.stuffbyduff.etsy.com


You should check it out!  I've started designing my own fabric to make baby blankets, bibs, ect. and its really fun!  I love what Photoshop can do!  Here is an example of some of the items in my shop.


On another note, I should be getting my new car sometime this week.  About two weeks ago, David and I were leaving Tae Kwon Do and someone ran a red light by a LOT, and totaled my car.  When I say by a lot, I mean we had a green arrow, the car in front of us turned left, then in the middle of us turning left David was able to say, "What the" and before I could respond the guy hit us.  So I will end up owing a bit more than I did on my last car.  But It will be a 2012 and I am able to get pretty much the same thing. Just so upsetting because it was just a little over a year old!  (and of course if it had been under a year, it was a year and three months, the insurance would have paid us to replace the car instead of what it was worth)


On a happier note, this week I start my photography class with my daddy!  It is this Thursday and will be once a week for three weeks!  I hope I learn a lot so I can take many many more pictures of my beautiful little girl Lilly!  She just turned 6 moths old and is so precious!  And of course to take more pictures of my other children (my doggies!)


There is sooo much more to talk about, but it is getting late and I have to sleep while Lilly sleeps or I get no sleep!  I hope I can keep up with this!  Blogs always sound like a good idea in theory but sadly haven't lasted in the past so we shall see!